
Getting started
DioramaPilot makes a Blender scene look like a model on a table. It blurs the top and bottom of the frame the way a real lens does up close, so the camera’s subject looks small. It needs Blender 5.3 or newer.
Install
Section titled “Install”- Download the DioramaPilot zip,
dioramapilot-1.0.0.zip. - In Blender, open Edit > Preferences > Get Extensions.
- Click the arrow at the top right and pick Install from Disk.
- Pick the zip and make sure the add-on is switched on.
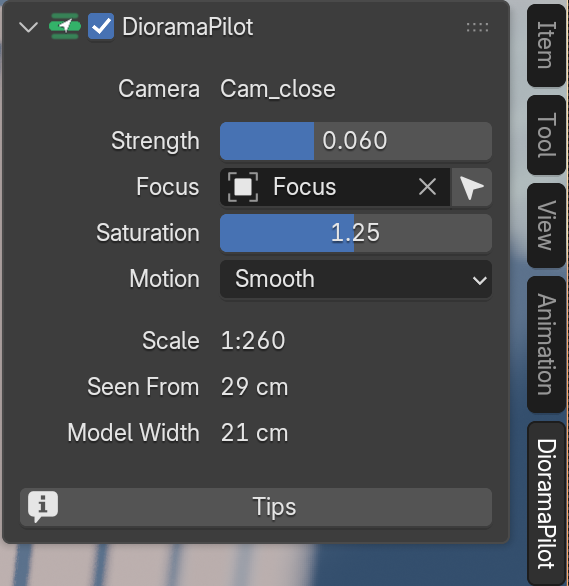
DioramaPilot has its own tab in the 3D Viewport’s sidebar: press N over the viewport and click the DioramaPilot tab. The panel works on the camera you selected, or else on the scene’s camera, the one F12 renders; its Camera row says which.
Your first miniature
Section titled “Your first miniature”You need a scene seen from above, such as a town, a street or a car park, and a perspective camera looking down at it.
- Press N over the viewport and click the DioramaPilot tab. Check that Camera names the camera you render with; select another camera to work on that one.
- Tick DioramaPilot in the panel’s header. DioramaPilot focuses on the surface in the middle of the frame and blurs the top and bottom.
- Look through the camera (Numpad 0) in Material Preview or Rendered to see the look in the viewport.
- To keep something else sharp, click the arrow next to Focus, then click that spot in the viewport.
- Drag Strength up to make the scene look smaller, down for a subtler look.
Render with F12 in Cycles or EEVEE: the render looks like the viewport. Untick DioramaPilot to get the camera’s own settings back. The guide explains every setting, and Tips in the panel says what would help your shot.